This article contains
- Creating a new record
- Updating and completing records
- Attachments and links
- Delete and restore records
Creating a new record
1. Select the New QIP button to get started.

2. Select a template
There are three options to choose from when creating new QIP records, each one containing a different set of questions.
- Improvement Plan - This is used to record a new improvement area or goal.
- Strengths - This is used to record and document areas in which the service is already proficient.
- Exceeding Themes - These should only be completed when there is evidence of one or more Exceeding NQS themes impacting on practice at the service.
3. Enter Details
For each record, you must first enter a Title and select a Quality Area. All of the other fields are optional.
Deciding on a naming convention for your QIP is a good way to make sure all of your titles are consistent as you add each record. You will want these to be short but descriptive enough to quickly identify a record when searching through a long list. The name should convey the issue or growth area which has been identified.
4. Save QIP

Updating and completing records
1. Open the record from the list page
2. Select Edit QIP button

3. Add text to existing fields
Each record only saves a single version, so progress notes should be added underneath the existing text and can be dated accordingly. Each paragraph box has a resizing tag to expand the text area.

4. Use the 'Mark as completed' toggle to change the status (OPTIONAL)
If the item has been completed, you can mark it as completed in order to move it into the completed list. This will also automatically set the current date as the completed date.

Note: If the completed status is removed and then readded, it will take the new / most recent date as the date completed.
5. Save QIP
Attachments and links
1. Open the record from the list page
2. Select Edit QIP button
3. Upload Attachments
Use the file uploader to select or drag and drop up to 20 attachments.
Accepted file types:
- JPG
- PNG
- CSV
- XLS
- XLSX
- DOC
- DOCX
Not Accepted:
- TXT
- PUB
- RTF
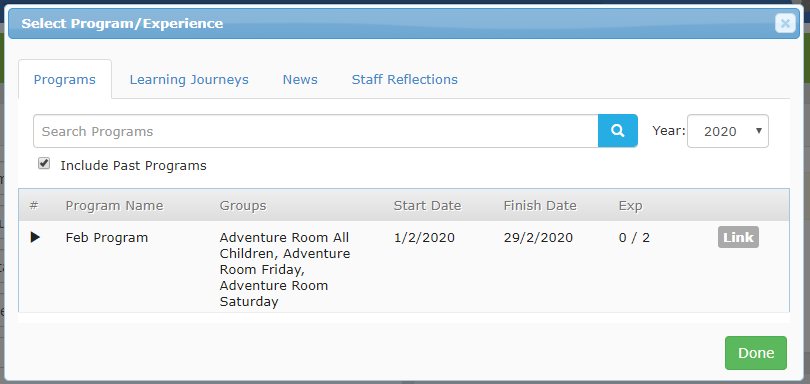
4. Add Links
Use the Link button to bring up the selection modal where you can add Programs, Experiences, Learning Journeys, News and Staff Reflections.

- Use the tabs to choose between different content types
- Click on the arrow next to each program to see a list of Experiences
- Links are only visible in the QIP module and will not show up on any programs or posts.
5. Save QIP
6. Viewing attachments and links
Click on the download icon to view attachments:

Click on the icon to view linked programs and posts:
Note: This function will be available in a future release

Delete and restore records
1. Open the record from the list page
2. Select Edit QIP button
3. You can delete individual links or attachments using the bin icon next to each item
Note: There is no undo or restore for deleted links or attachments.
4. You can delete the record by selecting the red 'Delete QIP'

5. To restore a QIP record, go to Deleted list and then open the record and select Restore QIP

Comments